After all the things that have been added to the KLR, rear end sag has been sub-par. Even before I started to add weight to the bike the sag was never right and that was maxed out on preload #5. I like to have rear sag around 25-35mm and the best it could give me was 45mm. Well I've bought a new rear spring for the KLR. The only place that sells one is Top gun, and they were very good to buy from. Never had to ask how or where my order is.
The hardest part was compressing the shock to remove the collar. You can see in the pic below I touched the shock body with my tool and put in a small gouge. No biggie it still looks pretty and now feels like a big bike. Now on setting #1 I have 30mm of sag and that's with everything on the bike. The bike also sits over on the kickstand and doesn't look like it would fall over with a good wind.
Before I installed the spring I checked the shock to see how well the preload adjustment worked. That threw me for a loop when I found that the rebound adjustment really doesn't work. Meaning it does and it doesn't, it controls shock over all speed. It should only effect rebound and compression should stay at a constant. Instead the adjuster slows down compression and rebound equally.
So with the new spring there is little compromise, because I would love to have a little less compression over rebound. It is now a lot better ride and doesn't feel like a chopper coming out of turns hard on the gas. I still need to take it for a spin down a dirt road that I'm familiar with to see how that is. That's gonna have to wait since the weather has given us some snow.
Would I do it again? Yes and the only thing I would of done different is let the bike shop swap out the spring.
Sunday, November 23, 2008
Test ride for the grips and further engine break-in
Did my first ride with the heated grips and loved it. temp was only 45 degrees but no cold hands here. With the setting put on high, it was just too hot but on low it's great. I think the big hand guards aid in keeping air off the outside of my hands, so your whole hands stay pretty even in temperature.
Happy bike and happy owner!!
The one thing that makes riding in the cold more enjoyable is my new head sock. Seirus head socks are by far the best for riding. I had a neck sock and that made your neck warm and that's about it. It would bulk up between your jacket and helmet and feel like a neck brace. Plus even though you have a helmet on, your head still gets cold.
Getting the sock to fit under your helmet is a little tricky. Learning the best way to pull it on and have it feeling even under helmet took a few trys. Here's a link to REI
Saturday, November 22, 2008
FINSHING OF THE HEATED GRIPS
Finally went over to my dad's and picked up his hole saw and a small file. We tested hole sizes because some people were saying a 13/16th hole saw was too big and the switch would move around. After a try with a 3/4 saw it was perfect. You can see in the pic their is a key way to keep the switch aligned in the hole. so I grabbed a small file from Dad also. He has all the perfect tools.
I decided to label the wires before going any farther and forgetting in ten minuets. The wife has a label maker and only took a second. Besides next year it would be a big guess where they went if it needs to come off again.
The plastic is really soft and flexible and cut beautiful.
You can see how clean and smooth the plastic cut.
Notching for the switch key way. Didn't take much work it get it right.
On the back the support rib need it be trimmed and cut away nicely with a razor.
Switch in place and fitting properly.
The kid testing out the grips with the bike running. They get hot fairly quick on high running on 14 volts.
So I did the head bearings two weeks ago and these are the only pic's I took. I for some reason HATE doing head bearings. It's basically the grease that bugs me, messy and get on everything. there's only one grease To use and it's a heavy farm grease that is used on tractors. It's waterproof meaning it won't wash out and it's still a high pressure type. I've done head bearings on all of my bikes that I restored years ago. The races were in poor shape and the cost was minimal.
The upper outer race was easy and pounded out. The lower was a different story and could not be pounded out. The race was unreachable with a punch. The dremel had to be used to relieve the press fit. You have to cut the race almost total through to the outer edge and then use a sharp chisel to whack the slot you just cut. Don't forget the safety glasses!!! The bearing races are a hardened steel and will chip away and will find your eye.
At work I do a simmilar thing with rear ends on the vans and trucks. I had a piece chip out and get stuck in my forearm, it didn't go deep but it hurt.
Ready to go again and this sunday is going to be 47 degrees. Hope to run it and see how well the grips work. Also get the engine break in finished up.
Friday, November 21, 2008
delayed and taking my time
So I was waiting to head over to my dad's house to get a hole saw to cut out for the switch for the heated grips, but life has gotten busy. My last uncle passed away over the weekend and oddly enough it was the same day my mom died two years ago. They were siblings. Also the baby is grouchy and sick, so disappearing into the garage is tough.
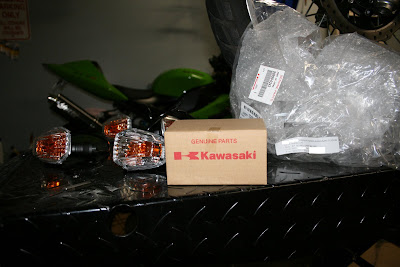
I was able to get my turn signals ordered last Saturday. On the 2008 KLR650 they were dry rotting and falling off at the end of warranty or just out of. This ticked me off and I went around the KLR forums and asked owners that had issues to report to safercar.gov. Lucky as it was over 90 owners reported in a month and it received attention. One forum member had a NHTSA inspector come look at his bike and in two month it was a recall.
Before I posted the info to the forums there were only two complaints so I like to think I really helped out to get this done.
Cost on the T/S for all four are over two hundered buck and thats the last think I'm dropping $$ on.
HERE's some recall pic's of the new T/S
Monday, November 17, 2008
HEATED GRIP INSTALL AND TRIP RESET FIX
To start off with my Idea of doing mods to anything is make it look like it's suppose to be there or not be really seen at all. With the heated grip I decided to run the element wires through the factory harness. Have the switch at the dash and in a fairly easy to see and operate spot.
In the pic above that is the heater harness pulled through the factory loom with safety wire and electrical tape. A small shot of WD-40 really made fishing the wires easy..
Wires are neatly pulled into the loom.
Getting the grips off were easy with a blow gun and a little turning. The glue that the factory uses comes off great with WD-40. You need to then get the WD off with rubbing alcohol and a rag.
What I'm using in the pic above is adhesion promoter and I highly recommend it. The 3M tape is good but won't keep it on the bar long enough to get the grip on. Most auto stores carry the promoter.
Element stuck and staying down!!
Hair spray works like a charm to slide the grips on and not disturbe the elements. It will take about two days to dry up all the way.
Safty wire used to keep the grips solidly in place but not nessary. It's just something I do to all my bikes.
That looks bad in the pic but looking at it up close and it's no a problem..
More to come on this in a few days!!!!
For my trip reset button it's been hard to push for a year and it's time to fix it. It feels like I'm crushing glass with a pencil and it's gonna crack.
If you click the pic you can see the three points that I applyed grease. Dielectric grease is all I recommend for the job. If any of the grease ever touches the electronics it won't damage it. Also DON"T use any sprays it will eventuly ruin the electronics.
After I put it all back together it feels perfect and smooth. Why did Kawasaki not address this in production?? Who knows!! It's fixed today..
Sunday, November 9, 2008
685 finished up and smooth
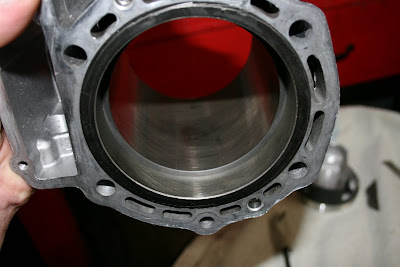
The bore & hone is done and looks great. The guy I trusted for job is a retired Boeing airplane machinist and now does beautiful restorations on mostly Triumphs. www.triumphrestorations.net/home.html
Nice fresh Bore & hone with the ring set down level to have the ring gap checked.
I set the top gap at .019, second ring at .026 and the oil scraper ring at the tightest spec .015
Also I did go with the .010 base gasket to get a little higher compression. I'll just have to keep a ear out for detonation especially on the trip I'm planning this next summer in the mountains.
I always forget how many miles I have or had on my projects so now I just take a pic of the odometer.
Sorry not to many pics of the job since I was very excited to just put the bike back together.
Sleeping the night before picking up the cylinder was hard. I'm not used to trusting someone to do mechanical or machining work for me. That was the toughest part of the whole job--trusting...
Over all the engine is smoother and may even be quieter mechanically. Could have a lot to do with the coated piston skirt. I only did 15 mile since it was recommend to go 5-20 miles and dump the oil and filter. Besides it's a cool 35F degrees, we will see if the weather gets warmer if I'll be able to finish the 200 mile break-in.
Next up it's time for heated grips and the replacement of rusty head bearings..
Subscribe to:
Posts (Atom)